
I'm having one of those weeks where so much seems pointless and hollow, marketing my work is exhausting, and all I want to do is hole up in my studio, retreat from the world, and make things. So I did just that. Instead of feeling guilty, I decided to see what good I could create from my agoraphobic episode. Turns out, a lot of good was just waiting there in the wings.
Have you ever heard of the Abandoned Art movement? I hadn't until a month or so ago, and I've been so intrigued by it. The idea is that the world needs more art. People need more joy. So folks like me who are going to obsessively create can put all that art to good use and leave it out in public places for others to find and love. And I've been abandoning a ton!
It's strangely cathartic to leave a piece of work out in the world without knowing what will happen to it. I like to imagine that each has at least made someone smile when they came upon it. Maybe my little creations have found new happy homes. Maybe they were tossed aside and stepped on. It's out of my control. No matter what, it's been good for me. I'm really, really skilled at losing touch with the world when I feel overwhelmed. But this idea of reaching out anonymously to others with art has kept me firmly planted in the realm outside my door. I've made it a point every day to go out and abandon at least one work somewhere random. It's helped me see the sidewalks and crevices and little tiny hollows just waiting for a little piece of art with new eyes. Every trip is a scavenger hunt for a new location. Thank goodness for it. Bringing a little beauty into the world has helped save me from myself.
I highly recommend it.
Friday, April 26, 2013
Thursday, April 18, 2013
Lessons Learned from Seven Years of Business
I've gone mad with the desire to organize all of my paperwork, which is a minor miracle if you've ever seen my desk, and realized that April is the 7th anniversary of when I started Found Beauty Studio. I've been a maker my entire life, but April 2005 was the first time I sold a piece to a stranger. This business has at times been the only shelter of consistency for me through a marriage, a divorce, selling a house, losing everything, having a complete nervous breakdown, moving an hour away, moving back, transitioning through four different day jobs, renting apartments, buying another home, and getting married again. It has been such a long, terrifying, satisfying, and often exhausting journey and I thought I'd share some of my lessons learned for those of you that may be thinking about running your own creative business.
1) If you can handle having a day job, keep it. Running your own business is a sure fire way to go broke for the first few years. Be realistic about your operating costs, as well as your personal bills you need to cover, and how much stress you can actually handle during the time you'll be pouring every cent back into your business. If you're making $50,000 at your office job, know that you may never see that kind of paycheck again. Can you deal with that?
There were a lot of times that having a day job saved my butt. I've spent a great deal of time experimenting with different lines and it's taken me years to find what sells. If I hadn't had that steady paycheck, I would have been homeless. It's not a mark of failure to have steady employment. It's a mark of understanding your needs and making smart choices. I, I have learned, cannot handle having a day job. It feels soul crushing and triggers my depression like nobody's business. For me, it's worth struggling with bouts of poverty and exhaustion to have the freedom to do what I'm cut out to do.
2) Ask for help. I don't know everything and neither do you. There are a lot of people out there who all have pieces of knowledge and experience that will make your life so much easier. Seek them out. Ask questions. Listen carefully and keep an open mind when they suggest something different than what you're doing.
I have struggled with this. I have often had a terrible fear of asking the wrong questions, looking dumb, feeling stupid, and opening myself up to criticism. In the last few years, though, I've turned that around and I talk to everyone I can. If there's a workshop, I take it. If I'm stuck on something, I find someone who does it well and take them out to coffee and pick their brain. If there's a professional who has a particular skill that I need (eh hem...accounting) then I pay them to do it. I took me a while to get it through my stubborn mind that asking for help is not a sign of weakness.
3) Kill your darlings. If you think a particular thing you make is awesome, but after a whole lot of marketing and effort it doesn't sell, let it go. In the world of owning a business, it's no longer just about what work you want to make - it's about making work that you enjoy and that people want to buy from you. Making a living does not mean you need to compromise your artistic integrity. But it does mean that you need to listen to your customers.
As I mentioned before, I'm stubborn. I hate criticism. I have a habit of taking things incredibly personally. Watching my work sit on store shelves and online and go nowhere was so painful. It felt like a rejection of me when in fact I was just making the wrong products and selling them in the wrong markets. I used to make bags. I made gorgeous, intricate bags. Each one took days to make and they were pretty darn expensive. And they didn't sell. And I needed to pay my bills. So I had a serious talk with myself to figure out what I found satisfying about making those bags and how I could have that same experience making something else. Turned out that my favorite part of making bags was seeing what I had imagined come to life. The bags weren't actually an essential part of the equation. I regrouped, figured out the materials that really excited me, and started experimenting. And I realized what I had always done as a hobby was the answer: working with plants. You know what my biggest sellers are? Planters. You know what I do when a particular kind of planter stops selling? I invent a new style. Lesson learned.
4) Don't undervalue yourself. This is a biggie. For many of us, selling our work evolves from something we've loved doing in our spare time and we're trying to recoup the cost of supplies. It's so easy to only consider the cost of materials when pricing your work and nothing else. Sometimes it's about just being so darn thrilled that someone wants to pay you for something you made that you'll take anything. Other times it's about thinking the answer to having more sales is to lower the prices. But here's the thing - your time and your talent are expensive. You are worth being paid for your work and not just your costs. The cheaper you price your work, the less value it has to your customer. If you're selling handmade earrings at $7 a pair, your customer will equate them with mass produced jewelry from a mall kiosk. Don't undervalue yourself!
I raised my prices a few months ago and I was TERRIFIED that I was getting too full of myself, that I'd fail, that my sales would disappear, that I was going to be laughed at. You know what happened? Nothing. No change in sales, no backlash, just an extra $200 a month from the same number of sales I was making before. No one batted an eyelash. It was all in my head. I also figured out that by always trying to price my work as the lowest, I was undermining my fellow artisans. It's death by 1,000 cuts. If we all keep lowering our prices, eventually we'll run ourselves out of business.
The biggest lesson of all that I've learned is that I'm better at this than I think I am. Until I took myself seriously, no one else would either. I'm making a living off of selling my work and I'm really proud of myself. It's been some of the most fulfilling work I've done. For those of you out there taking the leap, I wish you a ton of success, if you find yourself getting stuck, I'm happy to be one of those people you ask for help :)
Thursday, April 11, 2013
Before and After: Vintage Chest Restoration
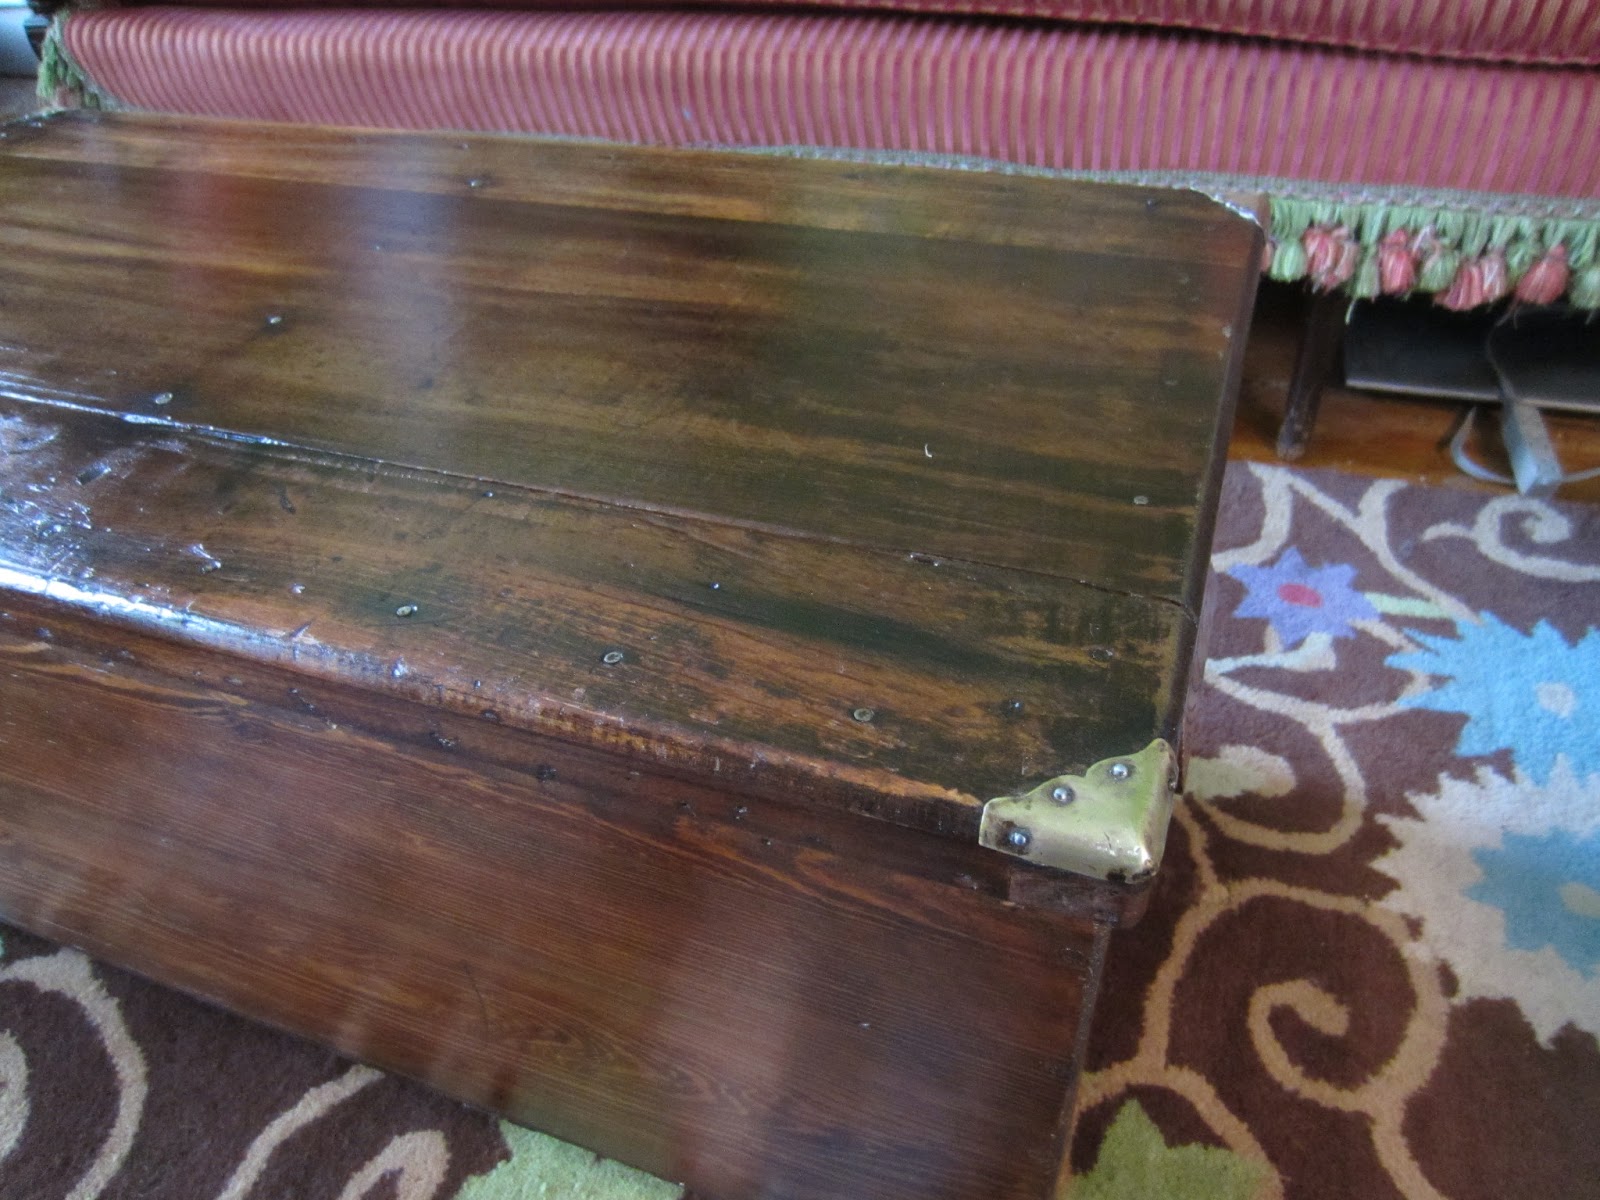
I love refinishing furniture. It's one of those activities that is just so incredibly satisfying. The progress is so obvious step by step and when it's complete? Oh, oh the joy! My friend Susi of The Felted Gnome Knows by Susio generously gave me a vintage chest that I believe belonged to her friend's mother. It had originally been wrapped in rattan woven fabric, but that had been removed some time long ago and left was the dried glue and broken bamboo molding. But the bones were beautiful, and it deserved to be treated with love and kindness. Here's the before:


My favorite tool for knocking off old heavy finish is a cabinet scraper. It's magic. It's a scraping blade attached to a handle and you just give it a lot of muscle and drag it across the wood to scrape off layer after layer. Not only is it a great workout, but it's also really effective. Here's the top of the chest after a few rounds of scraping:

You can see the dark spots around each of the nails where the blade couldn't get to, but with a thorough follow up sanding with 150 grit sand paper, it was down to beautiful bare wood:


Whenever I refinish old pieces, I always start the restoration process with a few coats of danish oil to saturate the dry wood. It gives the wood more resiliency and it fills the pores so that it doesn't soak up the final finish unevenly. You can see the difference in the color just with the oil:


Now, bear with me a minute while I give you this safety announcement. It is incredibly important to wear a mask while doing any of the sanding, scraping, and finishing, and this is why:

Because the sides were originally covered, they used different wood on the sides than they did the top and the colors just did not match. I don't often use stain, but in this case it tied everything together.


It was about this time that I realized the bamboo molding just wasn't salvageable, so I took a pry bar and a nail remover and took it all off. I really dug the look of the nail holes left behind so I kept them, but they could have easily been filled in with stainable wood putty.
If I had been thinking ahead, I would have done the repair work before putting on the stain, but I was impulsive and wanted the immediate gratification of seeing the color, so at this point it was time to go back and complete those repairs. When I took off the bamboo from the bottom right corner, part of the bottom came off with it, so I added wood glue to the joint, and then used small nails to reattach it.


The other repair needed? Nothing big, just, you know, the two front feet :) They were really loose to start with, and after the pressure of the scraping, they both came off. They were held on with long rusty screws that wouldn't come out of the curved feet, so I used a hack saw to cut off the protruding parts and drilled a hole for a new screw:

With a shiny new screws in hand, I reattached the feet and then gave them a nice coat of stain to match the rest of the chest. Welcome back, feet!

At this point there was nothing left to do but give it a nice sealer coat, and I used my favorite water based polyurethane. I have the best success by putting on a light first coat, waiting for it to dry and then sanding it down with 220 grit paper. I repeat that a few times until I build up the finish to the shine I want. In this case, it took 5 coats to complete.
And...drum roll please... here's the finished chest!


I must say, I'm in total love with the result. Not bad for a few days work, a set of clothes so fully embedded with dust and stain that they're now only suitable for in-house projects, and a little sweat equity :)
Friday, April 5, 2013
DIY Tutorial: Turn an Old Teapot into a Planter
It's no secret that I love plants. I mean, I make planters as a major part of my living. Plants make me happy. They're living, breathing pieces of nature that can miraculously live inside our homes. I don't particularly love, however, buying generic plant pots. There are so many fabulous household items that would make such interesting planters, it's almost criminal not to use them! Today I'll give you a quick and dirty tutorial on how to turn an old teapot into a happy home for a fern.
What you'll need:

It's a pretty simple process. While you could just add gravel and soil and stick your plant on in there, it's SO easy to overwater a plant in a pot without drainage. I've been growing and caring for plants for over 20 years and I still kill off plants without adequate drainage. Trust me. It's worth the time to drill the hole in the bottom.
The first step is to turn the pot upside down so that the bottom is facing you. Make sure it's on a sturdy non-slip surface. The last thing you want to see is your pot flying out from under you and smashing on the ground!
Choose your spot for your hole close to the center and mark it. This is where I use the center punch to leave a small indent so that the bit has something to grab onto, but you could also just use a marker and run the drill as slow as possible to get it started. It will dance around for a bit before it starts digging into the surface, so keep it as straight up and down and steady as you begin.


Step 2: Drilling! Drilling through ceramics can run the gamut from super easy to tedious, depending on how hard the clay is. I've drilled through terracotta in less than a minute, but for something like this teapot, it took me a good 45 minutes to get through. Any time you drill through a surface that can crack - ceramic, glass, acrylic, etc - low and slow is the way to go. You don't want to put too much pressure on the drill. You just want to let it do its job. And unless you want to bang your head against the wall in frustration, it's really, really important to use the right bit for the job. In this case, I needed to get through a thick fired glazed surface so I chose a bit made for cutting glass and tile.


As you drill, the material you're grinding up will clog the hole, so it's a good idea to stop every few minutes to rinse it under the faucet. I also add a little water to the surface to help lubricate the drill and cut down on the amount the bit will heat up. Remember low and slow? Good. Because this is where you'll probably get inpatient.
Drill on.

Keep drilling, rinsing, and drilling... It took about 25 minutes to get to this stage.
 Finally I made it through!


It's always a good idea to give your plant a 24 hour rest out of sunlight so it can adjust to its new home, and once it's ready to make its appearance, follow the care instructions for your plant and enjoy!!!

What you'll need:
- teapot
- electric drill
- glass, tile, and masonry bit
- gravel
- potting soil
- fern (or plant of choice)
- optional - center punch

It's a pretty simple process. While you could just add gravel and soil and stick your plant on in there, it's SO easy to overwater a plant in a pot without drainage. I've been growing and caring for plants for over 20 years and I still kill off plants without adequate drainage. Trust me. It's worth the time to drill the hole in the bottom.
The first step is to turn the pot upside down so that the bottom is facing you. Make sure it's on a sturdy non-slip surface. The last thing you want to see is your pot flying out from under you and smashing on the ground!
Choose your spot for your hole close to the center and mark it. This is where I use the center punch to leave a small indent so that the bit has something to grab onto, but you could also just use a marker and run the drill as slow as possible to get it started. It will dance around for a bit before it starts digging into the surface, so keep it as straight up and down and steady as you begin.


Step 2: Drilling! Drilling through ceramics can run the gamut from super easy to tedious, depending on how hard the clay is. I've drilled through terracotta in less than a minute, but for something like this teapot, it took me a good 45 minutes to get through. Any time you drill through a surface that can crack - ceramic, glass, acrylic, etc - low and slow is the way to go. You don't want to put too much pressure on the drill. You just want to let it do its job. And unless you want to bang your head against the wall in frustration, it's really, really important to use the right bit for the job. In this case, I needed to get through a thick fired glazed surface so I chose a bit made for cutting glass and tile.


As you drill, the material you're grinding up will clog the hole, so it's a good idea to stop every few minutes to rinse it under the faucet. I also add a little water to the surface to help lubricate the drill and cut down on the amount the bit will heat up. Remember low and slow? Good. Because this is where you'll probably get inpatient.
Drill on.

Keep drilling, rinsing, and drilling... It took about 25 minutes to get to this stage.


Then, the fun part - PLANTING!! I always add a 1/2 inch or so of gravel to the bottom of my pots to make sure everything drains smoothly, and then I add potting mix halfway up the container. Then place the plant in and fill around edges so that it's completely surrounded by soil.
I clearly work very cleanly :)
I chose a favorite plant of mine - the asparagus fern. Its fronds feel like feathers when you run your hand along them, and I loved the contrast of the sleek base against the softness of the fern.
Always give your plant a good drench of water after planting, and unless you want a big ol' water logged mess, I recommend letting it drain for at least a 1/2 hour before putting it on a wood surface. I chose the extremely technical "sitting it on top of a glass" option. We stay classy in our household.


Subscribe to:
Comments (Atom)
