Showing posts with label tutorial. Show all posts

Friday, May 10, 2013

Backyard Foraging: Sweet Dandelion Flower Fritters

I'm a workaholic.  I mean, I'm a serious, card carrying member of the workaholics club.  It's not something I'm proud of.  All it has given me is a debilitating case of perfectionism and stress.  But I've slowly been peeling back the layers of a self-imposed need to reach my impossible definition of success, and part of that process has been to engage in non-Found Beauty Studio projects.  Did you realize you can take on DIY projects that don't result in a sale-able product?  You probably did.  But I'm just starting to remember.  In my effort to step out of work world and add a little fun into life, I've decided to spend a few hours a week working on non-studio projects.  This past weekend was the first in hopefully a long series of workshops that have absolutely nothing to do with business.

So what did I do with that sacred free time?  I went on an edible plant ID walk!  Plants for food have always meant vegetables I've grown in a garden to me, so it was flabbergasting and amazing to see how many not just edible, but delicious and vitamin packed foods were growing in my back yard.    I love science.  I mean, I LOVE science!  Science is awesome and amazing, and realizing that nature and science had teamed up to lead me to free and healthy food was pretty flippin' awesome.  I've been running through the woods foraging for several kinds of greens this week like a kid in a candy store, but I'll stick to a very easy to find green for this post: dandelions.  Next week, stay tuned for garlic mustard. 

Like dandelions?  You may not have an answer to that.  But, like fried food?  Your answer is probably "yes, yes I do", because fried food is frickin' delicious.  So let's use fried food as the gateway to trying dandelions.  Dandelions- those lawn weeds that large companies have made billions of dollars creating pesticides to kill - are incredibly good for you.  They're readily available, and they're nutrient dense.  And delicious!  Be careful where you gather them, though.  If they've been exposed to pesticides, roadside chemicals, or contaminated soil, just say no.  If they've been growing in your own back yard and you've lived there for years and know you keep that baby pristine and chem free, go ahead and gather!

Greens are best before the plant has flowered because they can get a rip roaring case of bitter later on in their life cycle, but the flowers are wonderful right at their peak of blooming.  Pick them during the day when they're nice and open, and store in the fridge till you plan to use them.  They're mighty perishable, though, so best to pick them the same day you plan to eat them.  I harvested the flowers around 1pm and fried them around 6pm with no problem. 

Many thanks to Mountain Rose Herbs for the inspiration for this recipe!

Sweet Dandelion Flower Fritters


Ingredients

  • 30 - 40 dandelion flowers with approximately 1" of stem attached
  • 1 large egg
  • 1 cup soy milk (or milk/milk substitute of choice)
  • 1 cup brown rice flour (ap flour can be used too, if you can handle gluten)
  • 1 tsp vanilla extract (the imitation stuff will not work here, folks)
  • 1 Tbsp maple syrup
  • 1 tsp ground cinnamon
  • 1/4 tsp ground nutmeg
  • a pinch of salt
  • enough oil to coat the bottom of a skillet with approximately 1/4" of oil (I used olive oil but you can use whatever oil you want!)
Instructions:

1. Pick your dandelions and give them a good wash in cold water.  There may be dirt and a few tiny critters hanging on to them, so you may want to let them soak for 15 minutes to give everything a chance to clear out.  Rinse them off and put them flower top down on either a kitchen towel or paper towel.  Let them dry while making the batter.


2. Whisk together egg, soy  milk, flour, vanilla extract, maple syrup, cinnamon, nutmeg, and salt till it thoroughly combined and smooth.  The batter should be a little thinner than pancake batter, so feel free to add more milk if it looks too thick, or a smidge more flour if it's too thin.  You want it to be able to coat the flowers, but not completely overwhelm them. 


3. Add the oil to a large skillet and let it heat till a few drops of the batter start frying immediately when added.  You don't want the pan so hot that the batter burns, but you also don't want it cool enough that the batter droplets just sit there without cooking.  Too hot burns, too cold gives you oily fritters.  Fiddling with the heat till it's the right temperature is 100% worth the effort.

4. It's battering time!  Hold the flower by the stem, dip it into the batter, swirl it a few times, shake the excess batter off, and immediately place it, stem up, into the oil.  Work in batches of 10 flowers so you can keep an eye on them while they fry up.  It happens quicker than you think!


5. As soon as they are golden brown, remove them and leave them on a paper towel over a drying rack to cool.  You can sprinkle them with a pinch of cinnamon as soon as they hit the paper towel for a pop of extra flavor goodness.  You can serve them with a dipping sauce, or eat them on their own (I totally eat them on their own).


These are best eaten immediately.  They can be kept in a warm oven before serving, but after an hour they get a little soggy.  Honestly, though, they're too tasty to last more than an hour...


I highly recommend giving these a try.  And, as I found out, left over batter is a very handy thing to keep around, especially if you slice bananas, dip them in the batter, and pan fry them for breakfast!


Thursday, April 11, 2013

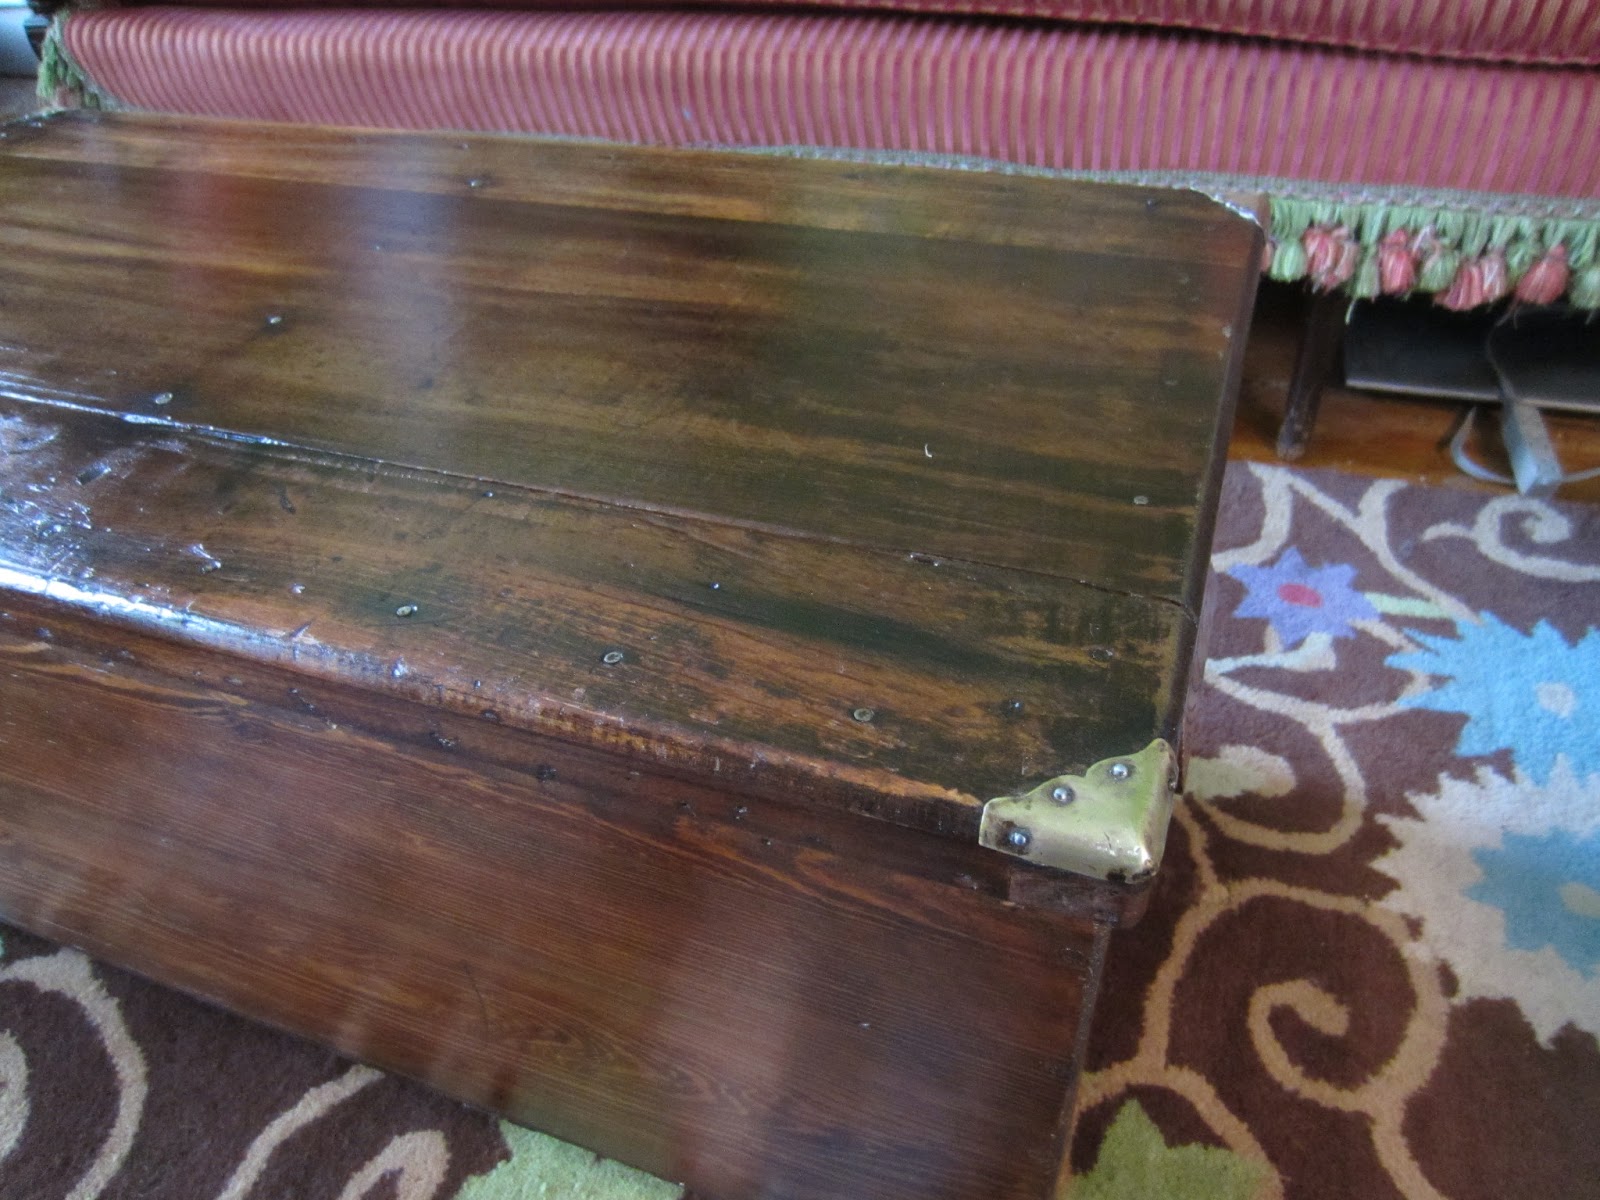
Before and After: Vintage Chest Restoration

I love refinishing furniture.  It's one of those activities that is just so incredibly satisfying.  The progress is so obvious step by step and when it's complete?  Oh, oh the joy!  My friend Susi of The Felted Gnome Knows by Susio generously gave me a vintage chest that I believe belonged to her friend's mother.  It had originally been wrapped in rattan woven fabric, but that had been removed some time long ago and left was the dried glue and broken bamboo molding.  But the bones were beautiful, and it deserved to be treated with love and kindness.  Here's the before:


My favorite tool for knocking off old heavy finish is a cabinet scraper.  It's magic.  It's a scraping blade attached to a handle and you just give it a lot of muscle and drag it across the wood to scrape off layer after layer.  Not only is it a great workout, but it's also really effective.  Here's the top of the chest after a few rounds of scraping:


You can see the dark spots around each of the nails where the blade couldn't get to, but with a thorough follow up sanding with 150 grit sand paper, it was down to beautiful bare wood:


Whenever I refinish old pieces, I always start the restoration process with a few coats of danish oil to saturate the dry wood.  It gives the wood more resiliency and it fills the pores so that it doesn't soak up the final finish unevenly.  You can see the difference in the color just with the oil:


Now, bear with me a minute while I give you this safety announcement.  It is incredibly important to wear a mask while doing any of the sanding, scraping, and finishing, and this is why:

See the difference in color between the bright white bottom and the brown sides?  Yeah...it all started as bright white.  Had I not worn that mask, all of that junk would be in my lungs.  Safety PSA over.  Back to the chest!

Because the sides were originally covered, they used different wood on the sides than they did the top and the colors just did not match.  I don't often use stain, but in this case it tied everything together.


It was about this time that I realized the bamboo molding just wasn't salvageable, so I took a pry bar and a nail remover and took it all off.  I really dug the look of the nail holes left behind so I kept them, but they could have easily been filled in with stainable wood putty.

If I had been thinking ahead, I would have done the repair work before putting on the stain, but I was impulsive and wanted the immediate gratification of seeing the color, so at this point it was time to go back and complete those repairs.  When I took off the bamboo from the bottom right corner, part of the bottom came off with it, so I added wood glue to the joint, and then used small nails to reattach it.  


The other repair needed?  Nothing big, just, you know, the two front feet :)  They were really loose to start with, and after the pressure of the scraping, they both came off.  They were held on with long rusty screws that wouldn't come out of the curved feet, so I used a hack saw to cut off the protruding parts and drilled a hole for a new screw:


With a shiny new screws in hand, I reattached the feet and then gave them a nice coat of stain to match the rest of the chest.  Welcome back, feet!


 At this point there was nothing left to do but give it a nice sealer coat, and I used my favorite water based polyurethane.  I have the best success by putting on a light first coat, waiting for it to dry and then sanding it down with 220 grit paper.  I repeat that a few times until I build up the finish to the shine I want.  In this case, it took 5 coats to complete.

And...drum roll please... here's the finished chest!


I must say, I'm in total love with the result.  Not bad for a few days work, a set of clothes so fully embedded with dust and stain that they're now only suitable for in-house projects, and a little sweat equity :)

Friday, April 5, 2013

DIY Tutorial: Turn an Old Teapot into a Planter

It's no secret that I love plants.  I mean, I make planters as a major part of my living.  Plants make me happy.  They're living, breathing pieces of nature that can miraculously live inside our homes.  I don't particularly love, however, buying generic plant pots.  There are so many fabulous household items that would make such interesting planters, it's almost criminal not to use them!  Today I'll give you a quick and dirty tutorial on how to turn an old teapot into a happy home for a fern. 

What you'll need:
  • teapot
  • electric drill
  • glass, tile, and masonry bit
  • gravel
  • potting soil
  • fern (or plant of choice)
  • optional - center punch
I started with a small green teapot that had once had a lid and strainer attached, but they both rusted and I was at a bit of a loss as to what to do with a teapot with no lid.  Easy answer - planter!


It's a pretty simple process.  While you could just add gravel and soil and stick your plant on in there, it's SO easy to overwater a plant in a pot without drainage.  I've been growing and caring for plants for over 20 years and I still kill off plants without adequate drainage.  Trust me.  It's worth the time to drill the hole in the bottom.

The first step is to turn the pot upside down so that the bottom is facing you.  Make sure it's on a sturdy non-slip surface. The last thing you want to see is your pot flying out from under you and smashing on the ground!

Choose your spot for your hole close to the center and mark it.  This is where I use the center punch to leave a small indent so that the bit has something to grab onto, but you could also just use a marker and run the drill as slow as possible to get it started.  It will dance around for a bit before it starts digging into the surface, so keep it as straight up and down and steady as you begin.   


Step 2: Drilling!  Drilling through ceramics can run the gamut from super easy to tedious, depending on how hard the clay is.  I've drilled through terracotta in less than a minute, but for something like this teapot, it took me a good 45 minutes to get through.  Any time you drill through a surface that can crack - ceramic, glass, acrylic, etc - low and slow is the way to go.  You don't want to put too much pressure on the drill.  You just want to let it do its job.  And unless you want to bang your head against the wall in frustration, it's really, really important to use the right bit for the job.  In this case, I needed to get through a thick fired glazed surface so I chose a bit made for cutting glass and tile.


 As you drill, the material you're grinding up will clog the hole, so it's a good idea to stop every few minutes to rinse it under the faucet.  I also add a little water to the surface to help lubricate the drill and cut down on the amount the bit will heat up.  Remember low and slow?  Good.  Because this is where you'll probably get inpatient. 

Drill on.


Keep drilling, rinsing, and drilling...  It took about 25 minutes to get to this stage. 


 Finally I made it through!


Then, the fun part - PLANTING!! I always add a 1/2 inch or so of gravel to the bottom of my pots to make sure everything drains smoothly, and then I add potting mix halfway up the container.  Then place the plant in and fill around edges so that it's completely surrounded by soil.  

I clearly work very cleanly :)


I chose a favorite plant of mine - the asparagus fern.  Its fronds feel like feathers when you run your hand along them, and I loved the contrast of the sleek base against the softness of the fern.  

Always give your plant a good drench of water after planting, and unless you want a big ol' water logged mess, I recommend letting it drain for at least a 1/2 hour before putting it on a wood surface.  I chose the extremely technical "sitting it on top of a glass" option.  We stay classy in our household.    


It's always a good idea to give your plant a 24 hour rest out of sunlight so it can adjust to its new home, and once it's ready to make its appearance, follow the care instructions for your plant and enjoy!!!


Friday, March 29, 2013

Behind the Scenes of a Photo Shoot

Today I thought I'd share a little behind the scenes look at how I photograph pieces for etsy.  I'm a DIY kind of gal, and if i can do something with a home grown solution instead of a lot of expensive equipment, I do it.   So my process for photographing my work to sell online is decidedly low tech.  Here's my photo studio - my kitchen :)


It has a small north facing window to the left of the table, and between 10:30am and 1:30pm, the light is perfect.  It's not too bright, it's not too dark, and it doesn't cause a lot of glare.  But, just sticking a planter on my messy table isn't exactly going to bring in the buyers, so I do a little rearranging:


I found out the hard way after photographing a ton of work that the colors in the mahogany table really mess with the color balance in my camera (a canon photoshot elph point and shoot) so I cover part of it with a plain old piece of foam core I found in my closet:


Next, the subject:


As soon as I get a close up shot, the setting works rather well:


I could use any inexpensive photo editing software at this point, since really all I do is crop and dicky around with the contrast, but I use photoshop since I'm comfortable with it and have been using it for years.  After tweaking, here's the finished product:


You can check out all the photos I used in the etsy listing!